
Thank you to Rubbermaid LunchBlox® for sponsoring this post.
This back to school season is a little bittersweet for me. We have our first child headed off to college, plus our second entering his senior year. All the while our third is in middle school and turning into a young man right before my very eyes. Do you know what this means? It means I’ve been packing school lunches for 12 years, ever since my daughter entered kindergarten at 6 years old. This also means that this year I’ll be packing only two lunches, instead of the normal three. Like I said, it’s all so bittersweet.
In my 12 years of lunch packing, I’ve learned a thing or two about efficiency. I remember very clearly one morning as I was in the kitchen getting their lunches ready, having an epiphany. It was a groggy epiphany (I’m not really a morning person), but it was a realization that made a difference nonetheless.
I noticed I was bouncing back and forth between the refrigerator, the pantry and the cabinets over and over again, just to pack a couple of lunches. My lack of organization, efficiency and use of products that could help me was very evident. It felt like packing lunches was taking forever!
That’s when I made a few changes in my system. Fast forward to last year and I added a new product to my lunch making routine that made life in the mornings so much easier.
Here are my 5 tips to creating a lunch packing station that saves you time:
1. Utilize smart storage products

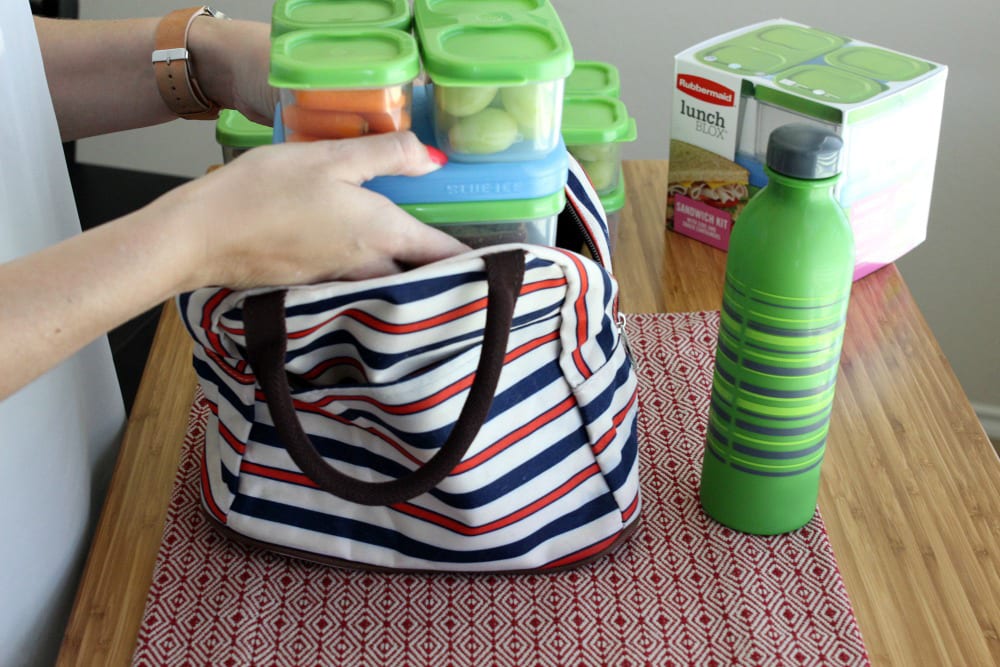
Last year my kids asked for healthier lunches. My two sons decided to experiment with the vegetarian lifestyle (they are now going on almost one year, so I’m thinking it’s not an experiment anymore!) and my daughter really wanted to add more fruits and healthier options as well. On top that request, I was personally working on less waste and focusing on using reusable items. That’s when Rubbermaid LunchBlox® entered my life. I purchased them at our local Target and was excited to get them home and use them to pack some lunches!


There are a number of reasons why these have become my favorite lunch packing tool. They keep food divided in separate containers, are leak proof with a secure lid seal, have built in Blue Ice™ to keep food cool on the go for up to four hours and can be configured to fit any size lunch bag. Plus, they’re microwave, dishwasher and freezer safe.

Right now you can save 10% to 20% off of Rubbermaid LunchBlox® and/or Rubbermaid Fasten+Go™ products with a Carthwheel coupon listed below. I love using the Target Cartwheel app to find savings. I check the app both before I go shopping and while I’m in-store.
Cartwheel coupons:
- Save 20% on all Rubbermaid Fasten + Go™ items August 7 – 13, 2016
- Save 5% on the Rubbermaid Lunchblox® Sandwich kit August 7 – 13, 2016
- Save 20% on Rubbermaid Lunchblox® August 28 – September 3, 2016
2. Organize your kitchen to work with you and not against
Instead of spending 10 minutes gathering all of my lunch making supplies, I keep them organized together. For example, a sandwich making kit in the refrigerator that includes meats, cheeses, condiments and jelly allows me to pull out one container, and have everything I need to make a mean sandwich at my fingertips.

I keep all storage containers for lunches, as well as baggies, clips, etc. in the same cabinet.
Keeping my space organized like this saves a lot of time, plus it makes it easier for the kids to make their own lunches.
3. Store lunch making pantry items in baskets
I have several baskets in our pantry and going to this system has been a huge time saver. Instead of keeping all of the bars and other snack items in the boxes, I take them out and store them in baskets. It makes it super easy to grab them for lunches. It also allows me to see what we’re running low on. I always love it when I reach into a box for something and it’s empty, don’t you? 

4. Prepare several days of lunches in advance


Spending a few minutes on a Sunday night to prep in advance is huge. Using the Rubbermaid LunchBlox kits, I fill the small containers with fresh fruit, vegetables and cookies and store them in the refrigerator. I usually save sandwich making for the morning of because I’ve learned over the years that freezing pb&j sandwiches or making them the night before doesn’t quite work for our family. So fresh it is!
Having the containers filled and ready to go makes school mornings run so much smoother.
5. Use pre-filled reusable water bottles

We started doing this last year, the same time as when I started to use the Rubbermaid LunchBlox kits. On our quest to waste less, we transitioned to disposable water bottles. My kids prefer water to juices for lunches and this has been perfect for us. I found some that they fit nicely into their lunch bag and thanks to the Blue Ice™ included in the LunchBlox, it helps keep their water cool as well.
So there you have it. A few tips I hope will help you pack lunches more efficiently!
One thing I’m planning on doing better at this year is lunch for myself. I was awful last year and often times either didn’t eat or grabbed whatever was most convenient, which usually ended up not being the healthiest option. My husband is also away from the house for lunch on some days (he’s not a homebody like me and needs to get out of the house!) and so he needs on the go options.

Thanks to Rubbermaid Faster + Go ™ containers, also available at Target, we can have a great lunch on the go. They have Entrée, Soup, and Salad Kit options and feature a removable strap that provides secure one-handed carrying and eliminates the need for a separate bag. My husband loves leftovers, so packing those up for him after dinner is the perfect way to get those leftovers eaten, and have lunch ready to go for him to take the next day. I can pack up one for me and have it waiting in the refrigerator. I see some yummy pre-made salads in my future.


Do you have any lunch making hacks or tips that help your school mornings run smoother? If so, I would love to hear them!
Check out Rubbermaid on Facebook, Pinterest, and Instagram!

The post 5 Tips to Creating a Lunch Packing Station That Saves You Time appeared first on Mom Fabulous.
No comments:
Post a Comment